Showing posts with label glide thread. Show all posts

Wednesday, March 09, 2016

A modern quilt for my bed


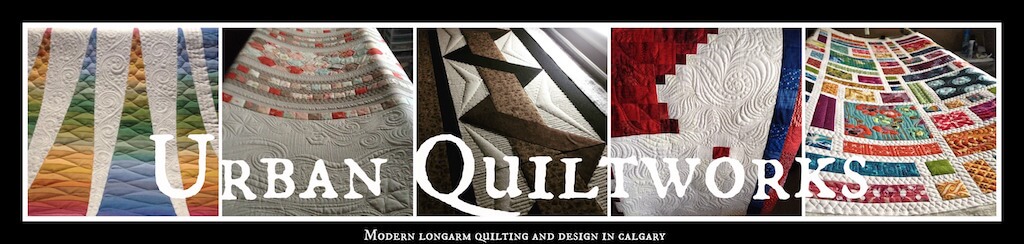
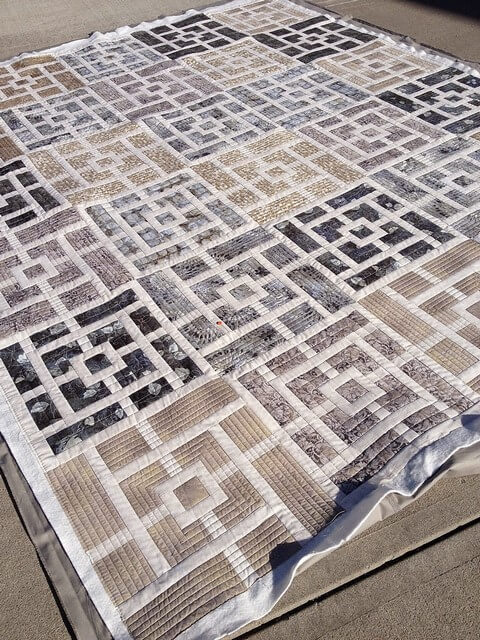
You know that saying -  the cobblers children have no shoes?   I'm the quilter who has no quilts.  I give them all away or work on others' quilts. Until now.  I finally made a quilt for my own bed.  A king sized quilt.  

  It is SO BIG!  
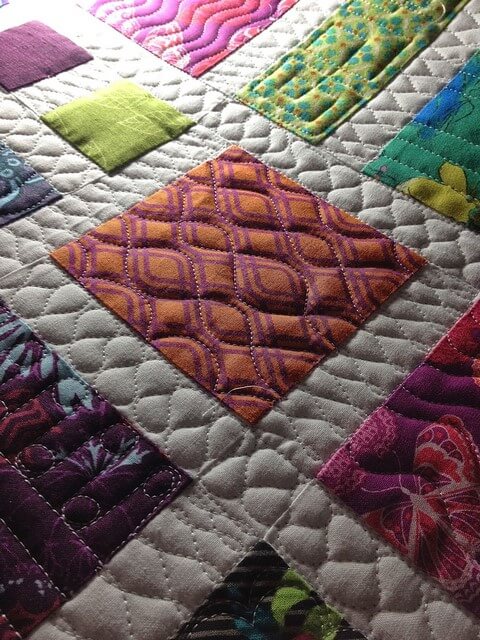
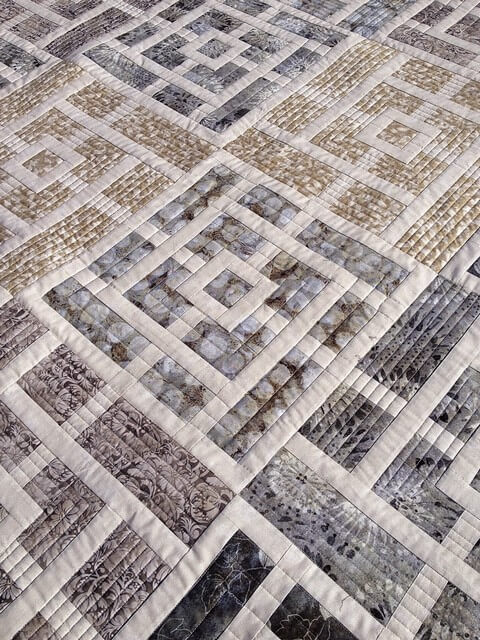
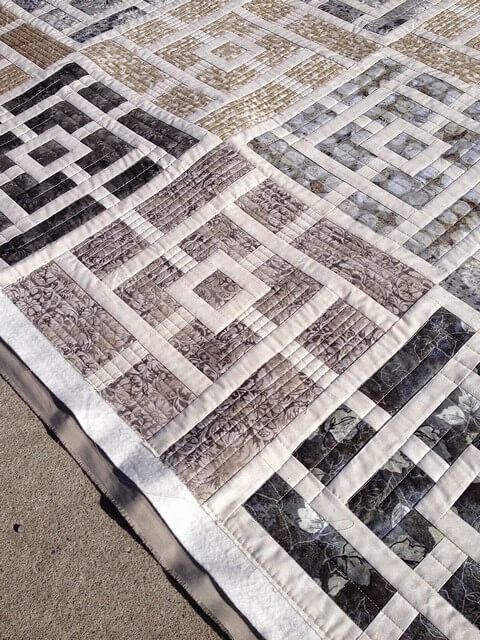
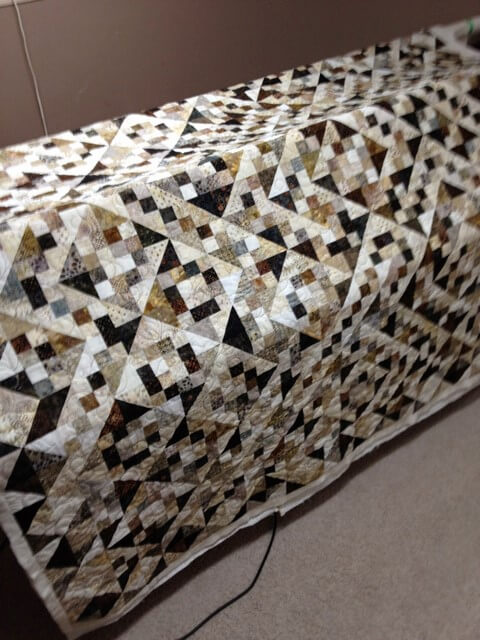
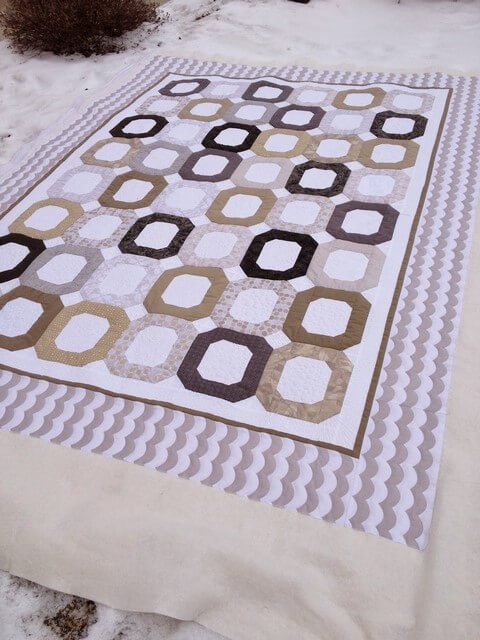
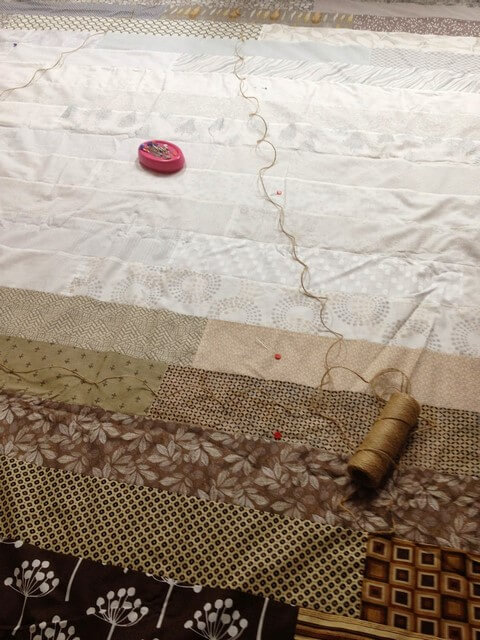
 I wanted something neutral,  simple and calm.   I chose a variety of neutral fabrics in taupes, and greys.  
 I chose someone else's pattern this time -  from Carolina Patchworks -  Sweet Garden  (Emily Cier) .   

I am not a happy pattern follower, and was grumbling a lot, but this pattern just seemed to suit what I wanted to do - and why reinvent the wheel?    But of course I had to add new treads to the wheel. LOL    I initially set out to adjust the pattern to be entirely a king.  Pieced it all together, laid it out on my bed and my heart sank - it was just too busy.  Too quilty.   Too much patchwork for the mood I wanted in my room.  
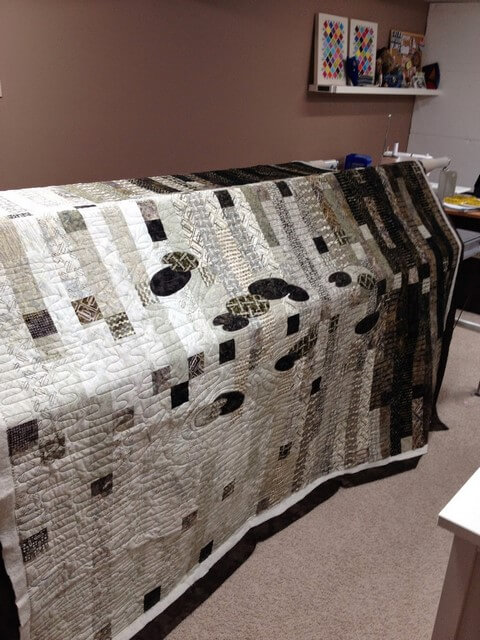
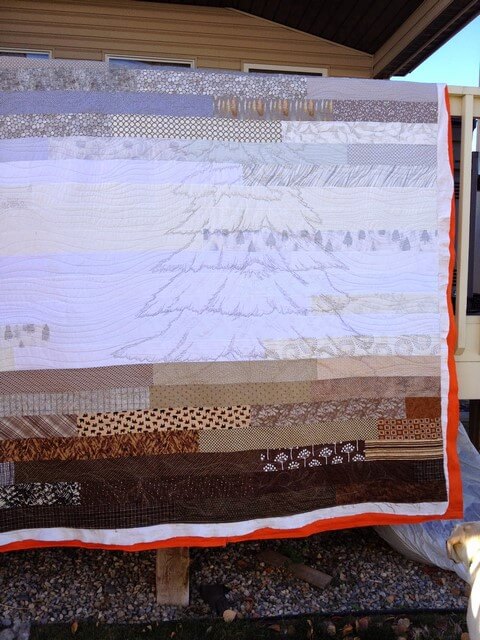
So I  *GASP*  hacked it up so it was a smaller bit of patchwork and added some calm, white fabric to the top and bottom.    And then I quilted it - and got a little carried away.   

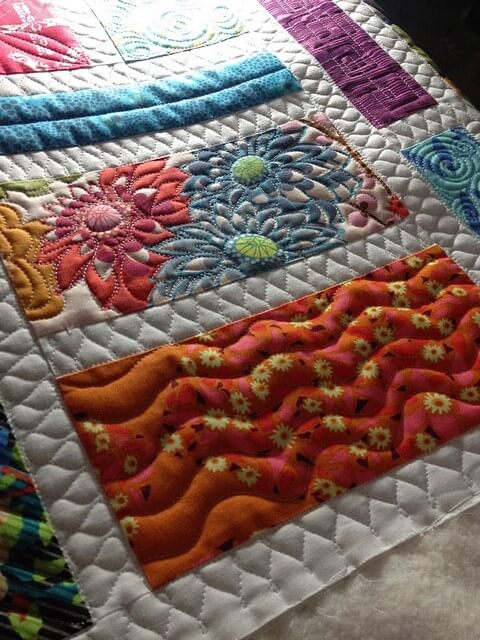
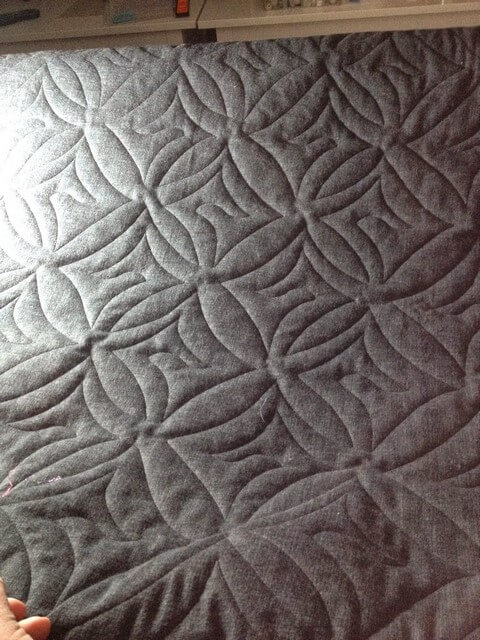
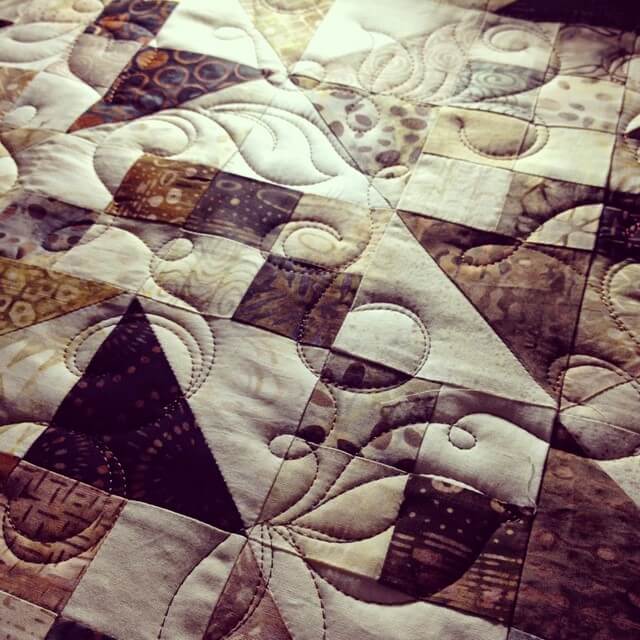
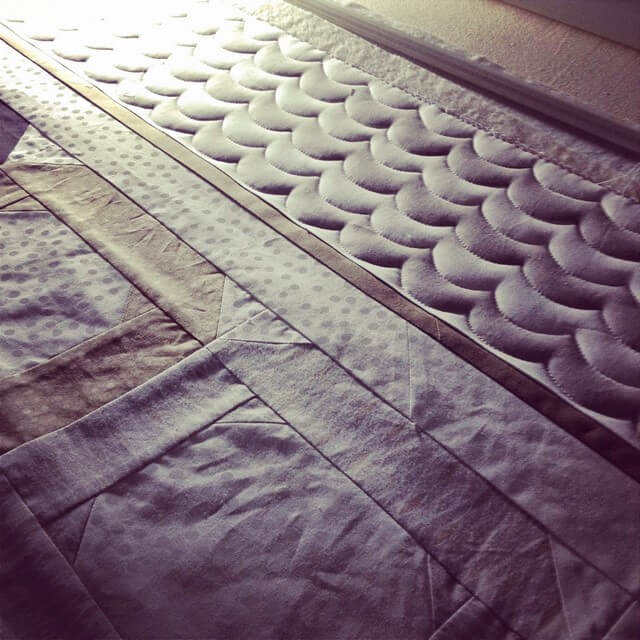
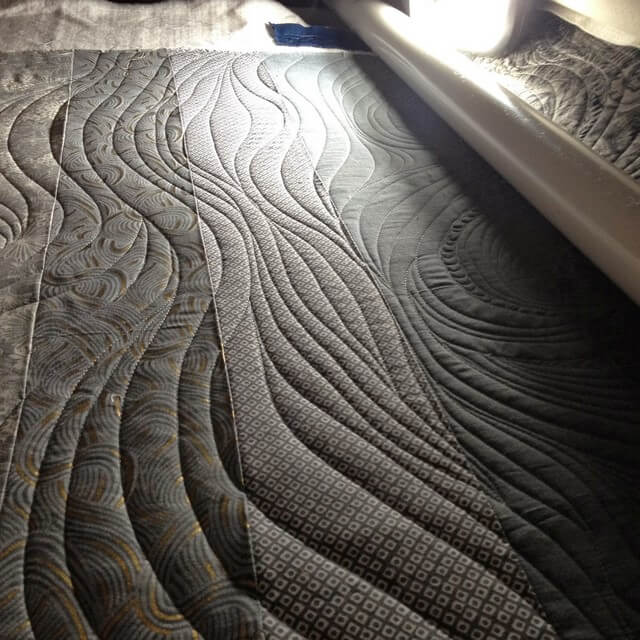
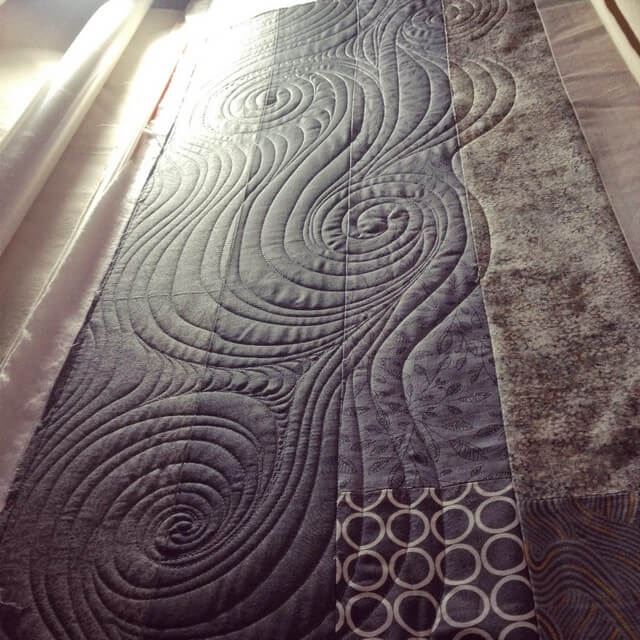
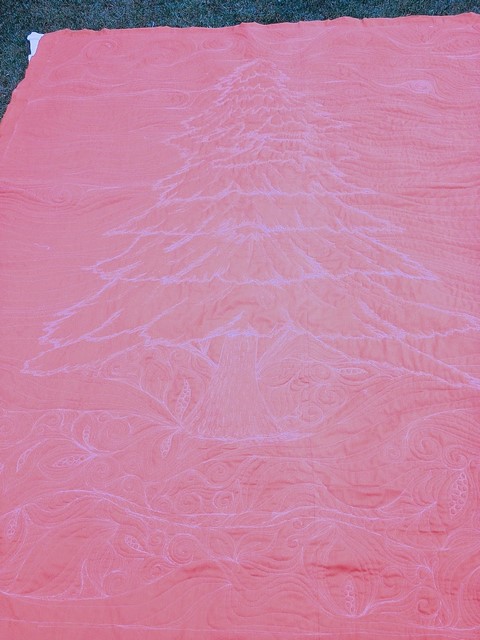
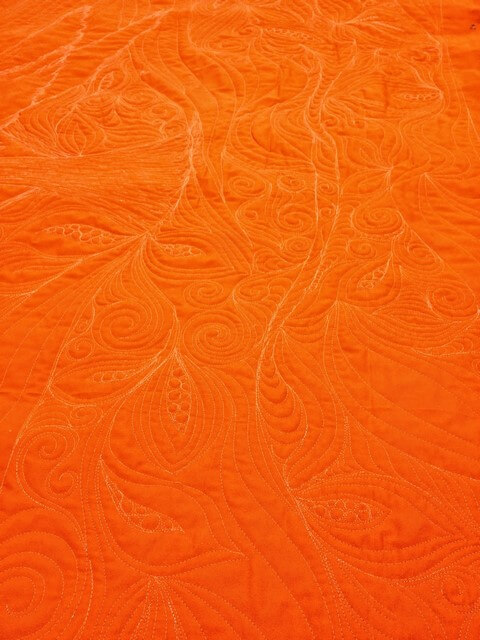
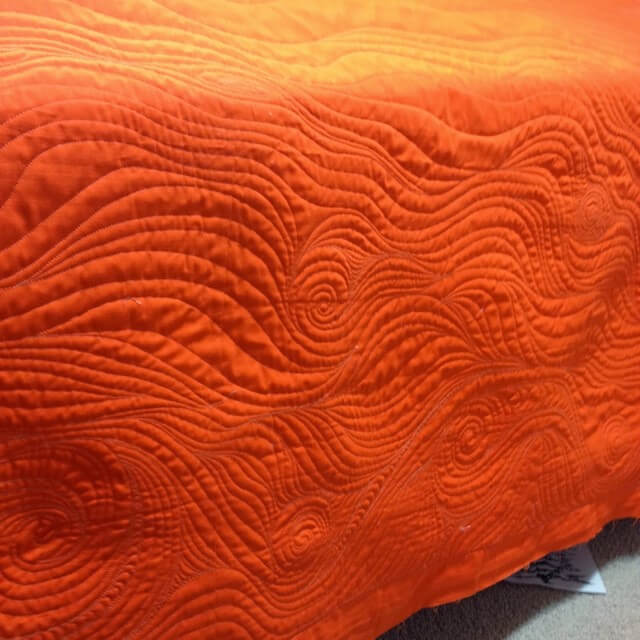
I started with simple waving lines....
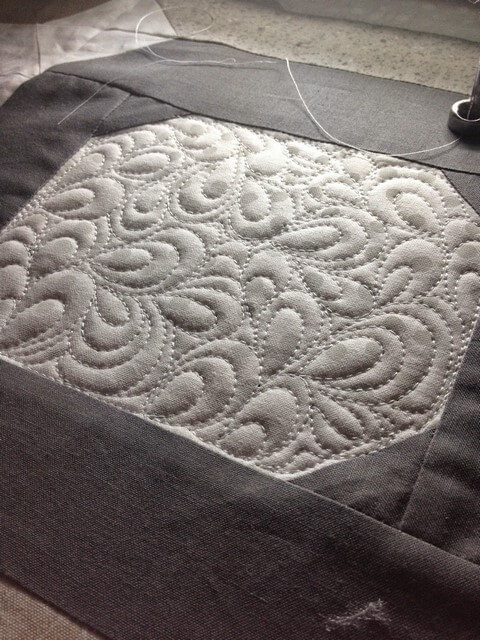
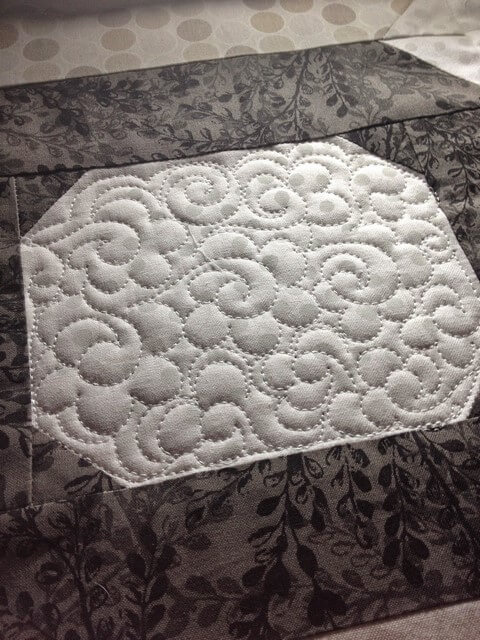
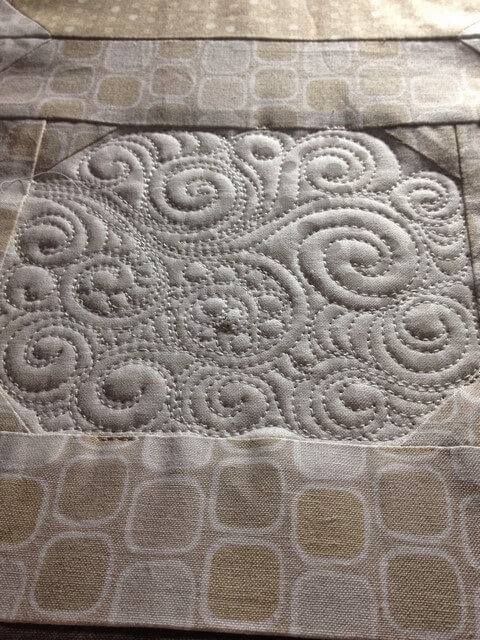
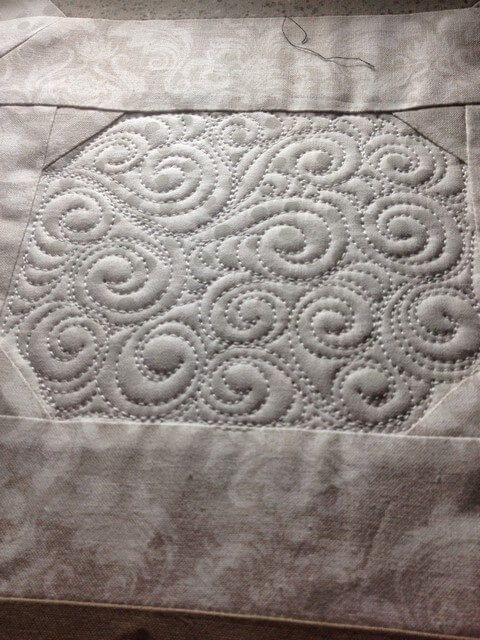
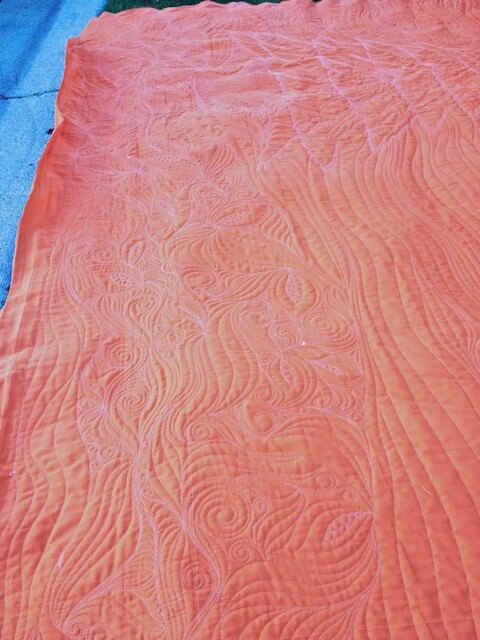
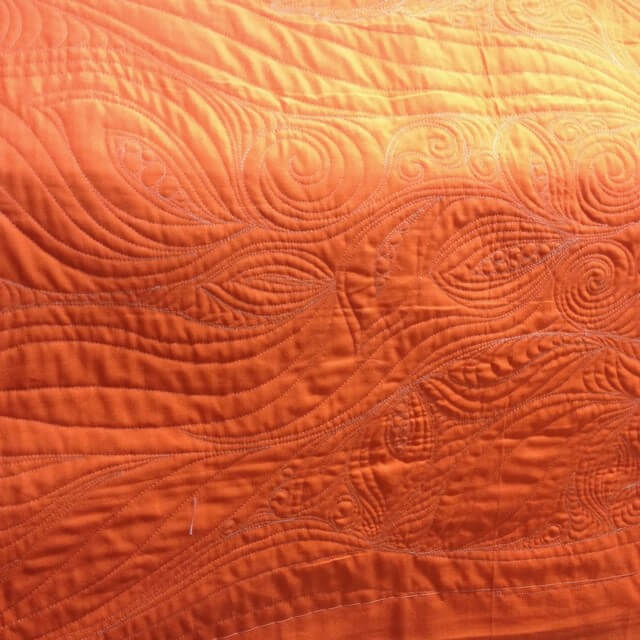
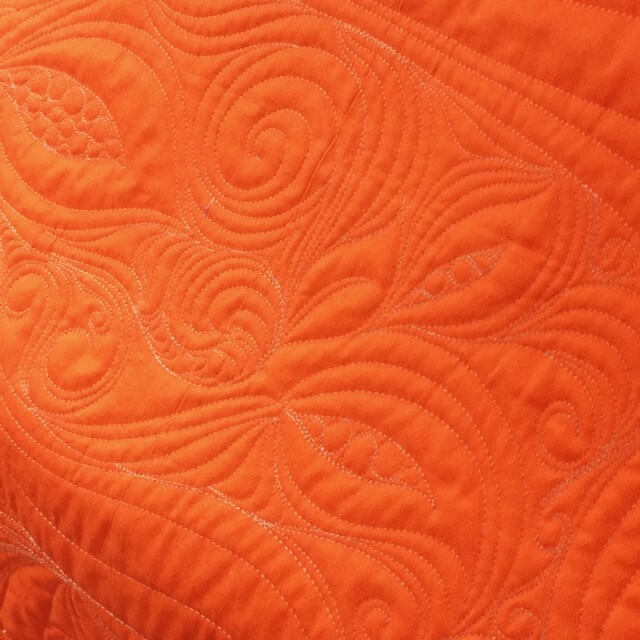
started to add swirls -  I just marked the 'c' shape of where I wanted the big swirl placements.  Then I started to fill in the shapes with fillers to show movement and flow.
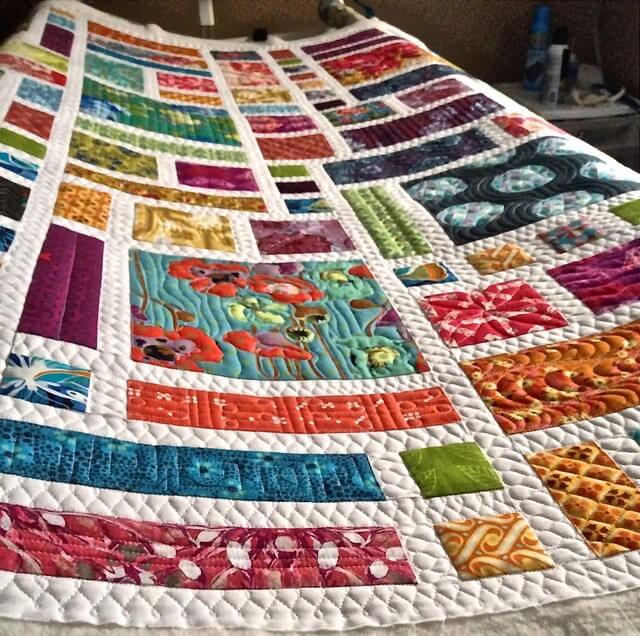
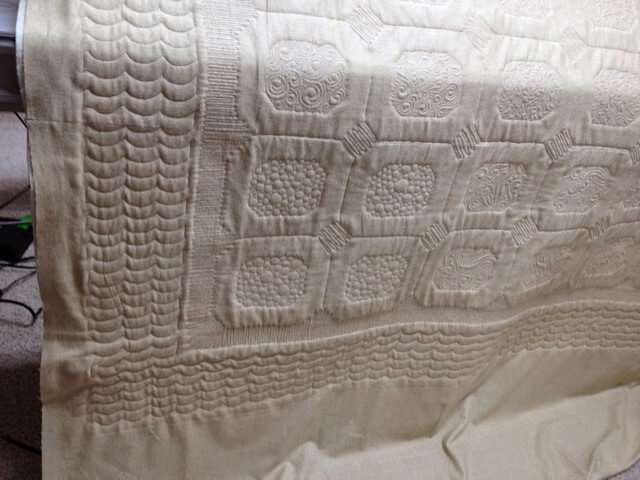
This is how the top '1/3' of the quilt looks:
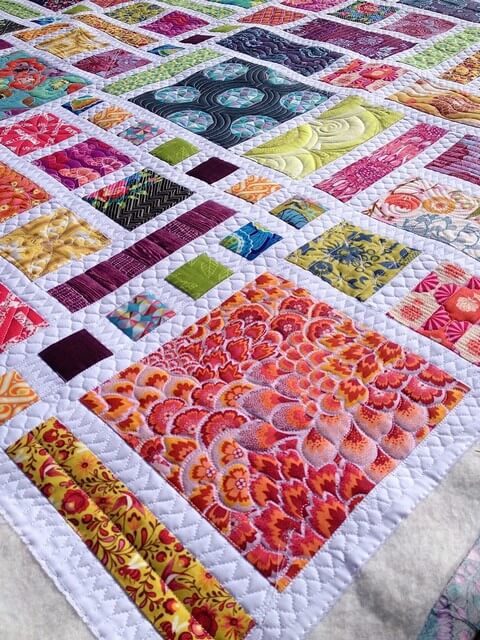
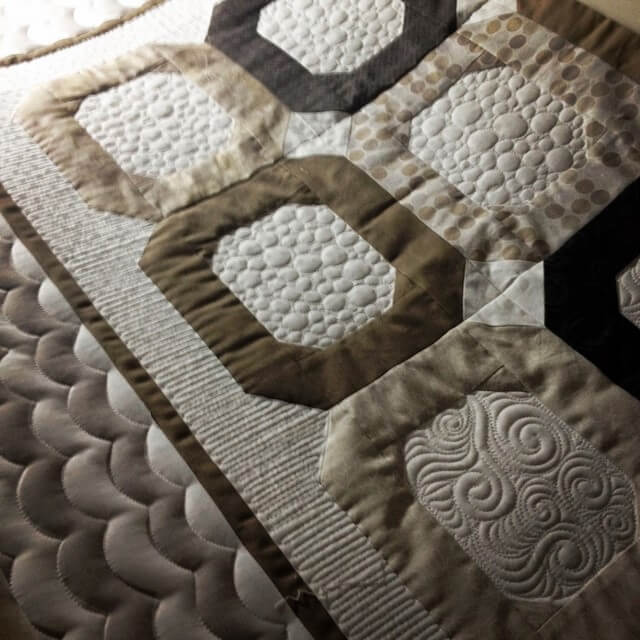
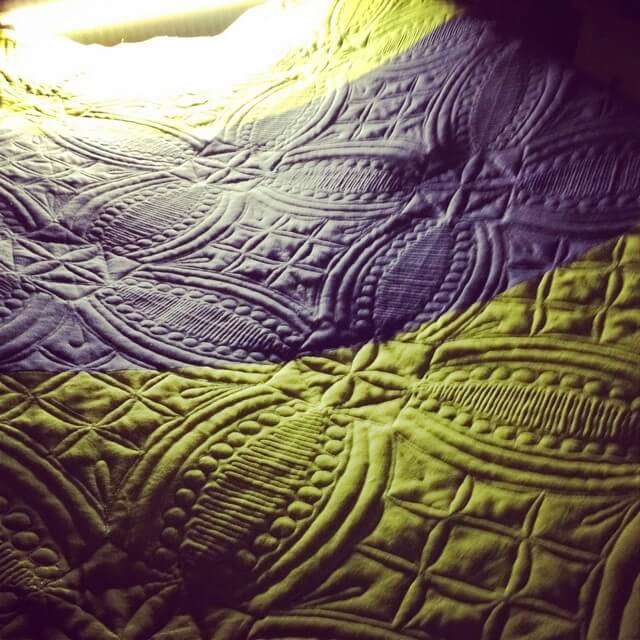
For the patchwork, I just did simple ribbon candy in the sashing. This gave the texture and allowed the squares to pop like little pillows.    For the squares or rectangles larger than 4'' I quilted a line or two in the space to keep the batting and fabric stable.  This is where I feel like a rule breaker.   I know it should be consistent amount of quilting throughout.   This is where I rebel and feel like I can't follow along.  I WANT this added interest.    
I mean, look at how the little pillows pop!  This is my bed anyways....I will report and edit this post in the future if I find out it is a useless experiment.   But I don't care.  I love this look.


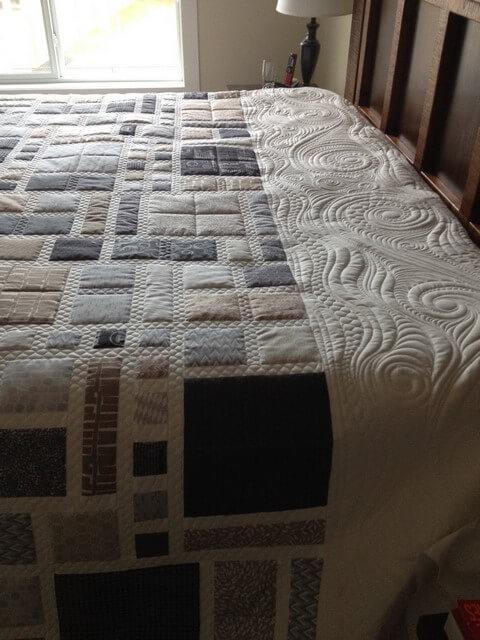
 This was very free flowing quilting - all improvisation with me just knowing that I wanted it to look swirly, flowing and show moment -  an ode to the beach, waters, etc.     
My quilt has yet to be bound.   It is still 'commando' without a binding.  I will keep it plain white to keep the focus on the quilting and the colour palette.   
 I hope you like it!  It's pretty breath taking on my bed.   Now I'm too scared to use it.   I am so super thrilled with how it turned out.   

Pattern - Carolina Patchworks  Sweet Garden by Emily Cier
Fabrics -  assorted prints - too many !   Kona cotton in Snow
Thread -  Glide thread in White,  Wonderfil Decobob bobbin thread white
Battings - Hobbs heirloom 100% wool batting.  
Hand guided quilting on my APQS machine.


Monday, March 23, 2015

Modern Custom Quilting...

 Stacey and her mom Lynn brought this beautifully pieced quilt to me.  (Carolina Patchworks - Sweet Garden Pattern)  I think I drooled a little...
 The colours were stunning,  so perfectly pieced,  and perfectly placed.  Every print that had a special direction, was placed in a uniform direction.   
 I did a figure 8/wishbone design in one direction of the sashing, and ribbon candy in the other.  
Some of the blocks I did swirls, pebbles, straight line details..
Each block was outlined with stitching for best definition:
 ...some of them I left on their own like these wee ones....they look like little pillows! 
 Some blocks I kept simple....
 ...and some blocks I used the print to dictate my quilting,..
 with outlines...
or following the detail in the print to give it texture...

The backing was just as beautiful -   the piecing, again,  perfect.  Here is a sample where it has been pieced: 

That's right -  where?!  

Hobbs 80/20 batting
Glide thread in white
Wonderfil Decobob grey thread for bobbins

Pattern:  Carolina Patchworks Sweet Garden

Quilted by me on my APQS machine


Monday, March 09, 2015

Modern straight line quilting

Tracy pieced this phenomenal quilt:
 The pattern is by Amy Ellis called Whispered Lace, in her book called Modern Neutrals. 

 I used the piecing as a springboard for some straight line quilting.  I marked registration lines to help with the quilting, using my ruler in some areas, and my channel locks in others.  

I used alternating designs of 1/2'' straight lines and 1'' lines, trying to emphasize that cream coloured desgin in the sashing. 
 
 It really helped to have meticulous piecing of these blocks, otherwise the straight line quilting would have looked very wonky!

This quilt is just gorgeous, and I love the design of the pattern!  

Glide thread top- cream
Wonderfil Decobob bobbin - taupe


Saturday, February 14, 2015

In the studio...

Linda brought in a few amazing quilts for me to work on this week -   I love the bold batiks anchored by the black sashing on this one.   We chose a pantograph pattern called Dazzle, and a fuchsia variegated thread by Aurifil.   
Better shot of the pantograph design Dazzle on the backing...
 The thread colour by Aurifil just sings on this top -  it melts right into the variety of colours, and then on the black sashing you see pops of the colour.  Love the colour choice!
This batik beauty was quilted with a looser overall design using leafs and swirls.
This design was fun to work on after a lot of dense quilting earlier on in the week.

 Tamara brought in this lovely batik quilt - Willow Stonehenge -The Pond pattern.   I quilted a long wavy grass texture in the darker areas, and a watery meander in and around the lily pads to represent the pond.  I used an incredible thread by Glide called Fool's Gold -  it is kind of a metallic army green and it really goes well with those brown and taupe batiks.   Need to order more! 
 I have learned that brown quilts are almost impossible to photograph!  I find it really hard to get the lighting right to show the quilting!  


Thursday, February 12, 2015

Neutral quilt with modern style...

Beautiful modern quilt pieced by Linda.  I love the neutral colours she chose.   
It was pretty easy for me to see how I would want to quilt it -  emphasizing the piecing and the contrast of light and dark....and Linda was all for it.  
 I densely quilted the inner white areas and the border, using a variety of simple fills like u-turns, swirls, pebbles.   This photo doesn't show it but  I also quilted down the centre white diamond shapes and stitched between the blocks for more definition. 

 The outer border of this quilt was a scallop print. It was carefully pieced with perfect matching edges.  I just quilted along the lines to give it some texture.  

 Clamshell fill
 swirl flower fill
 a mix of swirls and pebbles I like to call jewelled swirls.
 swirls
 Backing -  I also stitched the ditch area of the outer blocks to show definition of the piecing and stabilize the fabric some more.  


Wednesday, January 28, 2015

Urban 9 Patch quilt

This beauty was pieced by Shena of Apple Pie Patchwork  in Lethbridge.   Isn't it stunning?
Based on SewKindofWonderful's Quick Curve ruler and patterns.  I love how this one was done with an assortment of solids, framed in a dark navy blue. It's so pretty!


I lightened the photos a bit to show some of the quilting on the navy blue. 


 close up of some of the blocks as I was working on them - note some of the areas are not complete yet 

The backing is pretty too - I love how the quilting shows up.  


One thing that is always difficult is to pick a bobbin thread that will work for your top threads, especially when there are so many colours in your quilt.  This is especially true when you have a solid colour fabric backing....it will show every single thing! Because the backing was a green and navy solid,  I chose navy as my main bobbin colour.  Contrasting top and bottom threads are risky in that you may see evidence of them on either side of your quilt.   So,  I chose a navy bobbin thread for the majority of the quilt - except for the white top/white bobbin areas. 

I loved working on this quilt!

Quilted on my apqs machine
Hobbs 80/20 batting
Assortment of Glide and Superior Magnifico threads on top to match colours
Navy blue, white Decobob prewound bobbins from Wonderfil

I have some pretty amazing quilt tops in queue for the next while....stay tuned!

Tuesday, November 18, 2014

Modern Landscape quilt

If you are visiting from SewSister's Blogathon Canada! Welcome!!
I recently worked on a King sized quilt top that was really fun to plan out and design.    The client was quite easy going with the quilting to put on the top - but specified that a tree off center was to be a feature on the quilt.   Usually a quilt top has blocks and boundaries to keep your design in line and contained.  This one, I figured to be more of a modern landscape.   

I planned to do organic flowing lines in the background with swirls  to show movment.     The bottom of the quilt,  brown prints,  indicated the ground, and so I quilted swirls, leaf shapes, pebbles and lines in a flowing, more dense design.   

The spruce tree required a bit more planning and practiceI did a google image search - continuous line drawing – spruce tree;   spruce tree drawings,  etc. to come up with five or six images that I could play around with.   I would sketch them out on a scrap piece of paper, and then decide if I could manage that type of sketch as a large scale drawing on a quilt.  After analyzing and coming up with two designs that I thought would fit well with the fabric selections in the quilt top  -   I forwarded these two images to my client and had her choose what style she would prefer for the top.   When that was decided, I did a little bit more sketching on my whiteboard and paper.   

Next up, I had to estimate a scale for the quilt-    off center and large enough to look like it was ‘part’ of the quilt.     I actually laid out the quilt top on my floor and used string first and then painters’ tape to place an outline of the triangular shape and vertical trunk of the tree first.   After a few shifts in location and sizes, I then added a few tape ‘branches’ to mark out the different layers of the branches.      The tape worked well – but it does come off easily.   I also used a marking pen to mark some of the branch layers

Quilting the tree was not as easy as I thought - after doing just a single outline, I realized that I would need to do a bit of thread ‘painting’ to give more texture.   When doing this type of quilting, it is really important to step back a few feet as well, to get the whole picture of what the ‘painting’ looks like.   I had to be careful not to do too much thread painting, to keep the quilt soft and pliable.  Using the machine, my nose is often about 6-8 inches away from the quilt top – and so I see every. single. stitch.   And that can make one a little neurotic.   ;-)
 Back of quilt - photo edited a lot to show the tree -  the backing is actually a dark vivid orange.
The end result photos were really hard to capture the design and the texture -  the backing colour was solid orange – anyone have tips on photographing orange? But I did want to share my thinking and quilting process with you -  maybe it can help you in a future quilt.  Some of the following photos have been edited, lightened, etc to show more detail of the stitching.

Batting - Quilter's Dream 100% cotton
Thread - Glide thread top,  Wonderfil Decobob bobbin